Using and Setting up Trezor
If you have read Bitcoins.net review of the Trezor Wallet, you will know that the instructions that come with the hardware are inadequate to say the least. So this page tells you how to set up the Trezor wallet, how to store your bitcoins in the wallet and also how to make transactions in and out of the wallet
Setting up Trezor
Your TREZOR hardware cold-storage wallet does not contain a battery, so forget trying to switch it on by pressing or holding buttons in different combinations. To get it up and running you’ll need to plug it into a USB connection.
But before doing that you need to do bit of prepping which is not intuitive and also not included in the ‘User Manual’ provided with the hardware wallet itself. The quotes are used because said ‘manual’ is actually a piece of card measuring 9cm square with completely inadequate instructions.
First, you will need to download and install the TREZOR wallet bridge onto your computer. Go to the wallet page on the TREZOR website, locate the download button and select your operating system, then install.
After the bridge is properly installed, return to the TREZOR website and click “Wallet” on the top menu.
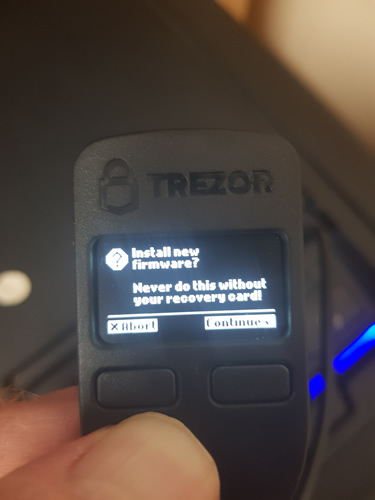
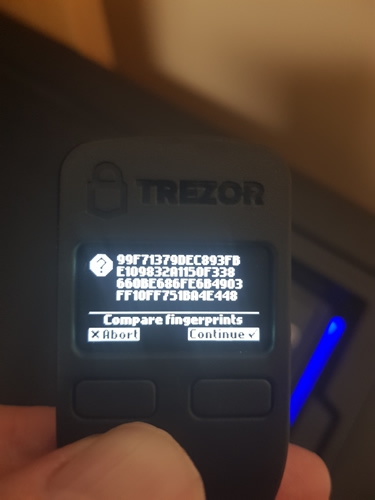
This time you will be prompted to install the firmware (for security reasons the device is shipped without firmware installed). Now is the time to plug your device into the USB port and power it up. You will be asked to confirm the installation on the device by pressing the right button to continue. The firmware will install and generate a ‘fingerprint’ on the device consisting of 64 numbers and letters. Compare that fingerprint to the one that will appear on your computer. If they match, click continue and the firmware installation will complete.
Unplug your device from the USB port and then reconnect. Ignore the fact that the device will tell you to go to the /start section of the website. Your computer screen, still on the wallet page, will now ask you to create a label for the device. This is simply a name that you can use for it and can be changed anytime, so don’t sweat too much in deciding what to call it.
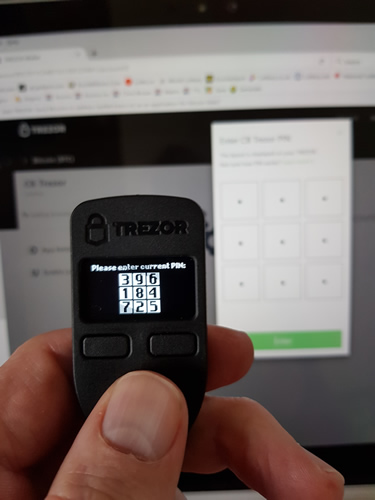
The next step is to set up a PIN. On your computer screen you will be presented with a PIN pad looking like nine boxes, 3x3, with a dot in the middle. Whilst on your device you will see a similar 3x3 matrix, but each box will contain a number.
To select your PIN, click on the dot on your computer screen corresponding to the number location on the device. In this example, if you wanted to select the number 8, you would click the bottom left box on the screen, whilst if you wanted the number 5 you would click the middle box. It is suggested that you don’t pick simple PIN numbers. It wouldn’t take a thief long to work through numbers like 1111, 2222 or 3333, or even 0001, 0002 and 0003. And did you know that an analysis of stolen PIN numbers available on the dark web showed that 11% of users selected the numbers 1234!
As you select your numbers the screen will give you guidance as to if the number is too simple or if it is fine. Click enter to finalise.
Now the numbers on the TREZOR device will change into another random sequence and you’ll be asked to re-enter your selected PIN onto the screen, again using the boxes with blank dots. Of course, this time you will be clicking different boxes that correspond to your fixed PIN number.
Just like a password, there’s a possibility you will forget your PIN. So, now you need to setup a recovery mechanism which they term a “recovery seed”. The device will be displaying the first of a combination of words. Write it down somewhere (you are provided with two cards for this purpose in your purchase pack) using a pen or pencil – do NOT save it digitally (remember, this is to be your cold wallet). There’ll be a total of 24 randomly generated words, which may seem like an effort, but it is for storing your bitcoins which have monetary value, so it is worth it. Make sure, of course, that you spell the words correctly. We all know “Letter I comes before E except after C”, right? But what about ‘weird’? Anyway, to make sure you have written your seed down correctly, the 24 words will be repeated for you to check, before once again entering your PIN.
It may be at this point you are wishing that the mini USB connection cable was a bit longer - so you can write the seed down easily or so you can hold the device up near your screen when entering your PIN. The one that comes in the box is a miserly 19cm or so. You can buy a longer one at Amazon or many electrical outlets.
You should keep the seed record in a different place from your Trezor device. Now, if you happen to lose, misplace or have your Trezor stolen, you can recover your funds and accounts using the seed.
Trezor memory
Your private data is stored in persistent memory in your Trezor device. This means the data will not be erased even when you power it down by removing it from the USB connection, and that includes not using the TREZOR for a long period.
Receiving Bitcoin with Trezor
Receive bitcoins into your Trezor wallet buy heading back to Trezor.io, plugging in your hardware and entering your PIN. Next, click on “receive” to generate an address and corresponding QR code. Give that code to the person sending you bitcoin.
When the coins are sent to your account, you will see this as a balance on the account corresponding to the address you gave the sender, along with your chosen fiat currency rate
Sending Bitcoin with Trezor
Again, go to your wallet and log in with your PIN. This time select “send”. Now it is your turn to enter the address that you will have been given by the intended recipient. Add the amount of bitcoin you are sending to see what that would be in fiat currency, and finally select what fee you are willing to pay from high, normal, economy and low. There’s also the option to set a custom fee, but as Trezor will warn you, this is not recommended. You could over-pay or, worse, set such a low fee that your transaction gets stuck forever.
When you click ‘send’ you will need to enter your PIN again, and then confirm the transaction on your device. Check the amount you are sending and the address you are sending the bitcoins to before confirming. This is an important step, so don’t just click ‘confirm’ without looking at the data in case you computer has been compromised, perhaps with a virus. The final step is to confirm the fee that you will be charged.
Using Trezor with your phone
It is possible to set-up (including PIN), customise and recover your Trezor using mobile apps. But you cannot send or receive bitcoin using Trezor with your phone. To do that, you would need to use another mobile wallet, such as Mycelium, in conjunction with the Trezor hardware.
Other functions with Trezor
- Trezor allows you to do many other things, including:
- Change the homescreen image
- Create cachphrases to create new sub-wallets, each hidden behind a cachphrase.
- Disable PINs
- Wipe the hardware
- Enable device labelling (in conjunction with Dropbox) so you can
- rename your accounts
- add your comments to your transactions
- add a label to addresses
- change your fiat currency
- change the currency backend to another cryptocurrency
- send and receive encrypted messages
- verify addresses with messages
- update firmware
- Use as a Two-factor authentication device